


While plugins in WordPress are essential, they can greatly influence the performance of your website, as each plugin adds PHP code that has to be executed, which usually includes scripts and styles. WordPress is unfortunately very bad at how it loads and manages plug-ins and therefore the optimization of your load speed suffers because of it.
By default, all plugins in WordPress are loaded throughout the entire website, even if they aren’t being used by a specific page or post. This causes unnecessary code to execute every time a person visits one of your website articles, resulting in slower load speeds.
However, by learning how to Disable WordPress Plugins Loading on Specific Pages and Posts, we can fix this problem and increase our websites page speeds.
Page Speed matters in Google Search rankings
Google has officially stated that Page Speed (the time it takes for a page on your website load), is one of the direct factors that it takes into consideration, when ranking you in the search results. Therefore, a slow loading page will rank you lower than a similar page on someone else’s website, that loads faster.
To see what is loading on your website, you can use the official Google Page Speed website tool, Pingdom Tools or GT Metrix. Each of these will give you a breakdown of how much code is being loaded each time someone visits your website.
To optimize this, we obviously don’t want code from plugins that aren’t required on the certain page to be loaded. Not only is this a waste of resources on your hosting, but it also causes a visitor to have to wait longer when visiting your website, as well as negatively influencing your Google search ranking.
Only Load necessary Plugins per Page or Post
Fortunately there is a solution in managing WordPress plugins better, by telling it to only load the necessary and required plug-ins, on a per page or posts basis, while disabling the rest. This does not disable the plug-in entirely, but rather only loads it when needed.
For example:
Contact forms such as Contact Form 7 and Gravity Forms are notorious culprits of loading their code on every page and post on your website, even when there isn’t a contact form on that page.
This is unfortunately due to lazy coding on the developers side, as they can actually code their plugins to only load when there is a form shortcode, within a specific page or post, but they haven’t done so.
This results in their code loading throughout your entire website, which as we have established executes unnecessary code, resulting in slower load speeds.
If your Homepage doesn’t have a contact form, then there is absolutely no need for it to be loading the scripts of a contact form plugin. Only the page with the contact form (such as your Contact Page), should load these scripts, as it’s the only one that needs them.
Check which plugins load on every Page and Post
Before we start to manage and disable unnecessary plugins on a page and post basis, let’s first create our own plugin that will show us exactly which plugins are loading on each post and page.
This will help us to see just how many unnecessary plugins are loaded, so prepared to be amazed.
As this might be your first experience at creating your own plugin as well, it’s also a good exercise in learning more about WordPress in general.
Create Active Plugins plugin
To create a plugin to track the other plugins that are loading in your WordPress website’s pages and post, all you need to do is the following:
- Navigate to your WordPress plugins folder, located at “…public/wp-content/plugins”
- On a live website, use an FTP program such as Filezilla to go to ”/public_html/wp-content/plugins”
- In Local, this will be in “Local Sites\YOURWEBSITE\app\public\wp-content\plugins”
- In your WordPress Plugins folder, create a new folder and call it “active-plugins”.
- This needs to be spelt exactly like this, including it being all lower case and the hyphen.
Next, we need to create the plugin script using PHP code:
- Open a text editor, such as Notepad on windows, or better yet, download and install Notepad++ which is a much better Notepad editor than the default Windows one, as it understanding coding languages, as well as a ton of other great features.
- Open Notepad or Notepad++ and create a new document
- Copy and paste the following code into the new Notepad document:
<?php
/**
 * @package active-plugins
 * @version 1.0
 *
 * Plugin Name: Active Plugins
 * Plugin URI: http://wordpress.org/extend/plugins/#
 * Description: This is a development plugin
 * Author: Your Name
 * Version: 1.0
 * Author URI: https://example.com/
 */

add_shortcode( 'activeplugins', function(){

	$active_plugins = get_option( 'active_plugins' );
	$plugins = "";
	if( count( $active_plugins ) > 0 ){
		$plugins = "<ul>";
		foreach ( $active_plugins as $plugin ) {
			$plugins .= "<li>" . $plugin . "</li>";
		}
		$plugins .= "</ul>";
	}
	return $plugins;
});
Save this as “active-plugins.php” (again this needs to be spelt exactly like this), inside the “active-plugins” folder that we created in the “…public/wp-content/plugins” folder.

Activate plugin
That’s all that’s required to create a WordPress plugin. Not too difficult really. Alright, so next, we need to activate the plugin inside of the WordPress admin dashboard, just like any other regular script.
- In your browser, navigate to your WordPress admin dashboard, and go to “Plugins > Installed Plugins” or by going to “YOURWEBSITE/wp-admin/plugins.php”, to activate the newly created “Active Plugins” plugin.

Add Shortcode to Page and Post
Last but not least, we need to add the shortcode to a test page and/or post to see which plugins they are loading:
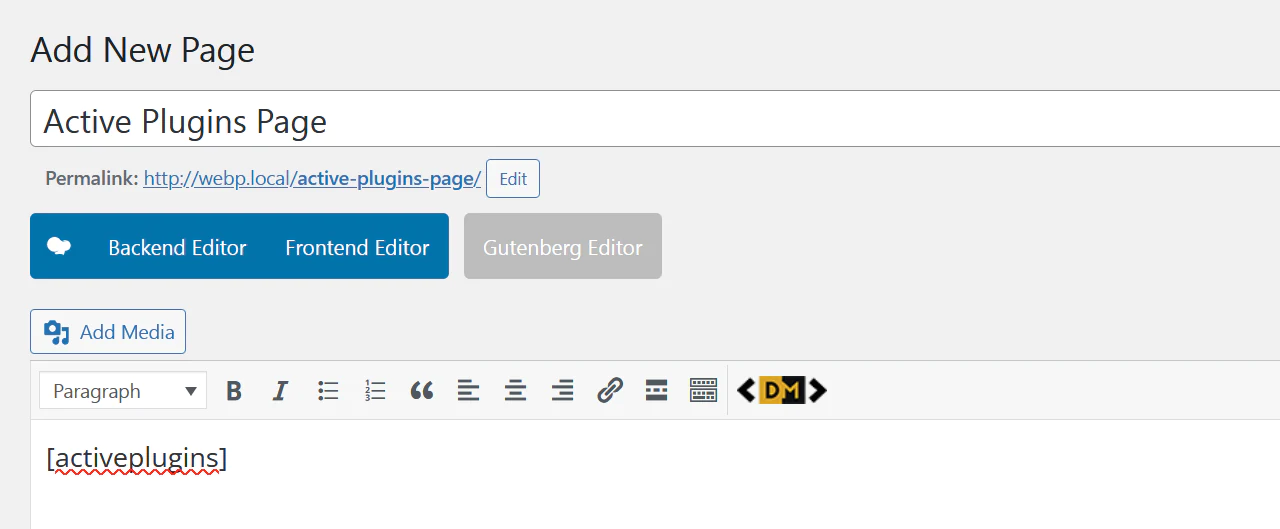
- Create a new Page and call it “Active Plugins Page”, then also create a new Post, and call it “Active Plugins Post”
- In each of these, add the shortcode [activeplugins] anywhere in the text.
- Click “Save Draft” to save it as a draft. We don’t need to publish this Page and Post for it to work, which is great as we don’t want it showing up on our website’s frontend.
Click “Preview” to preview the Page and the Post.
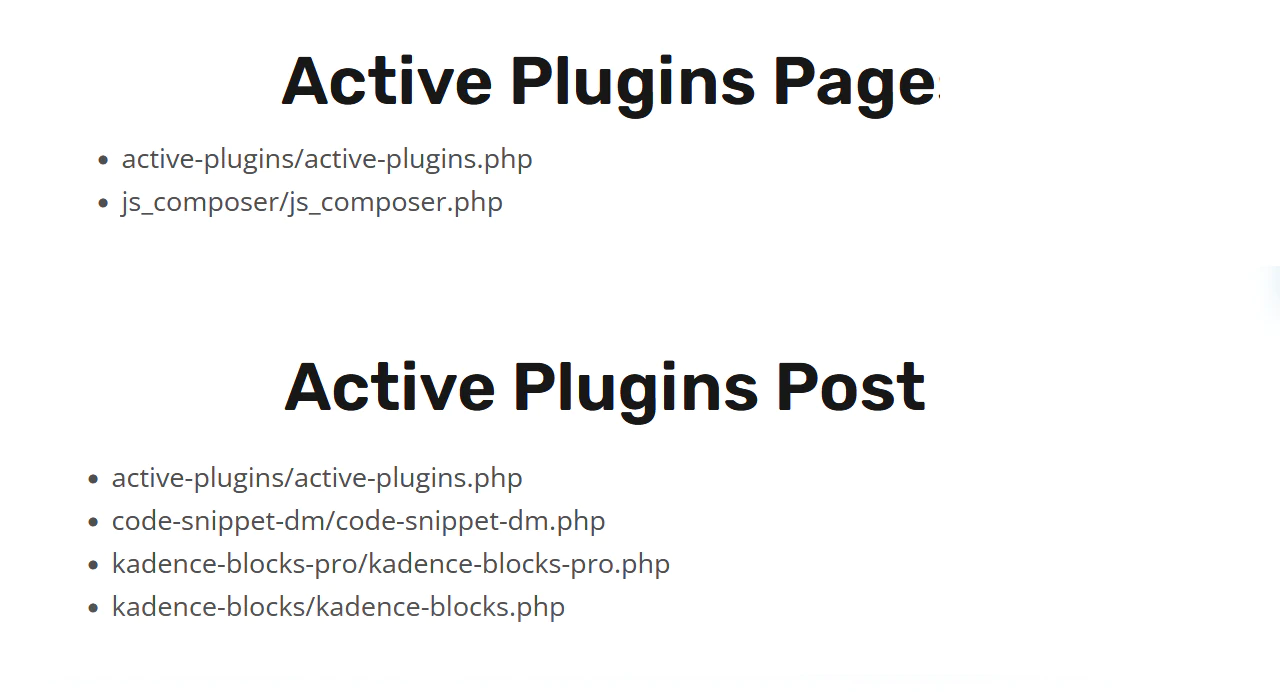
You should now see a list of all your active plugins of your WordPress website, which at this point should be loading all the plugins you have active in “YOURWEBSITE/wp-admin/plugins.php”.
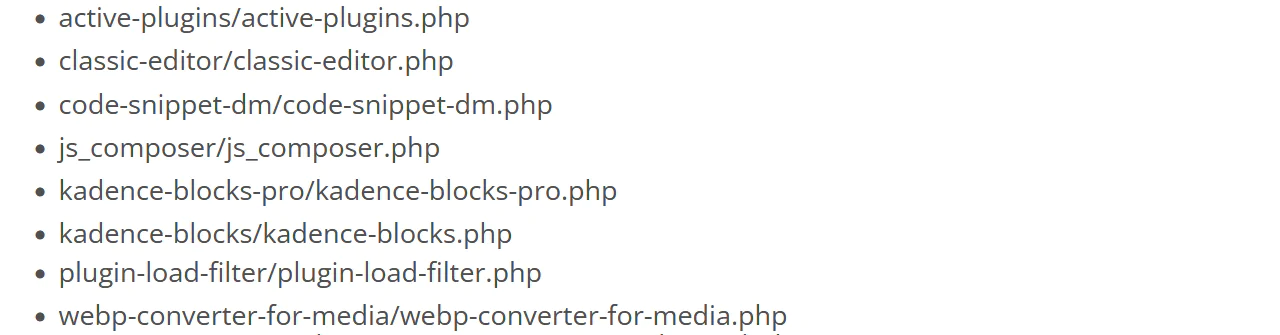
Because of this, both the Page and the Post should be loading the same plugins, unless a developer specifically programmed it not to, but in general this won’t be the case.
Next we want to organize and disable plugins that aren’t required on both Pages and Posts, but rather separate them accordingly, as well as keep some to only load in our admin dashboard.
How to Disable WordPress Plugins Loading on Specific Pages and Posts
To disable plugins on specific pages and posts programmatically, we are going to use another free plugin to selectively load and disable each of our active plugins.
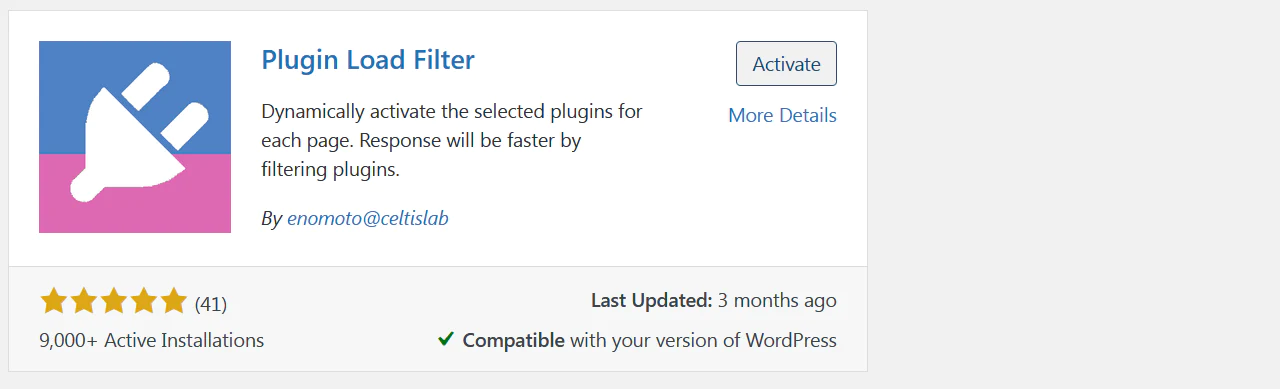
This WordPress Plugin Manager is called Plugin Load Filter and will help us to conditionally load only the required plugins that we need on our WordPress homepage, posts and pages.
- In your WordPress admin dashboard go to “Plugins > Add New” or go to “YOURWEBSITE/wp-admin/plugin-install.php”
- In the search type “Plugin Load Filter” and click the “Install Now” button.
- Once installed click the “Activate” button.
Plugin Load Filter Setup
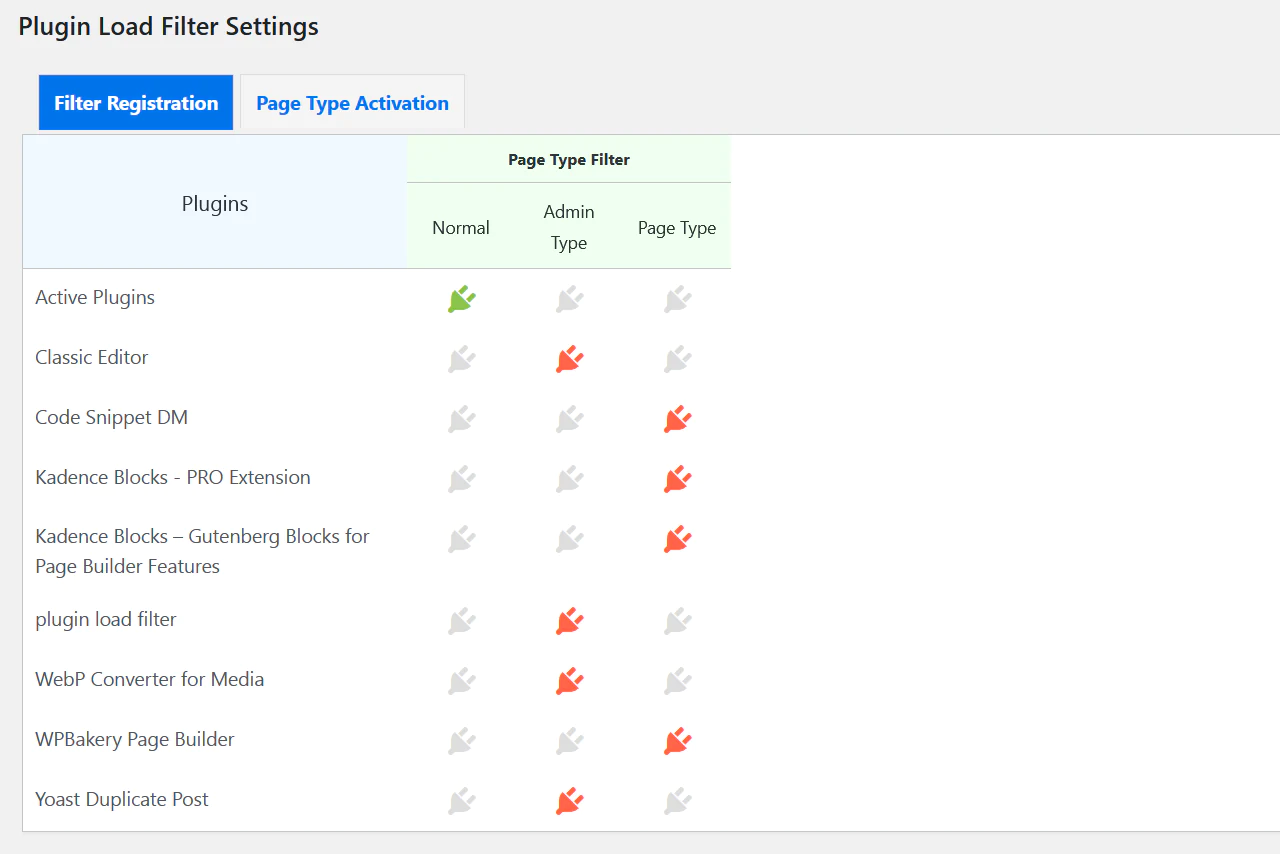
Now that the “Plugin Load Filter” plugin is installed and active, let’s tell it which plugins we want to conditionally disable, depending if they should only load in the backend dashboard, on our homepage, a general page or a post.
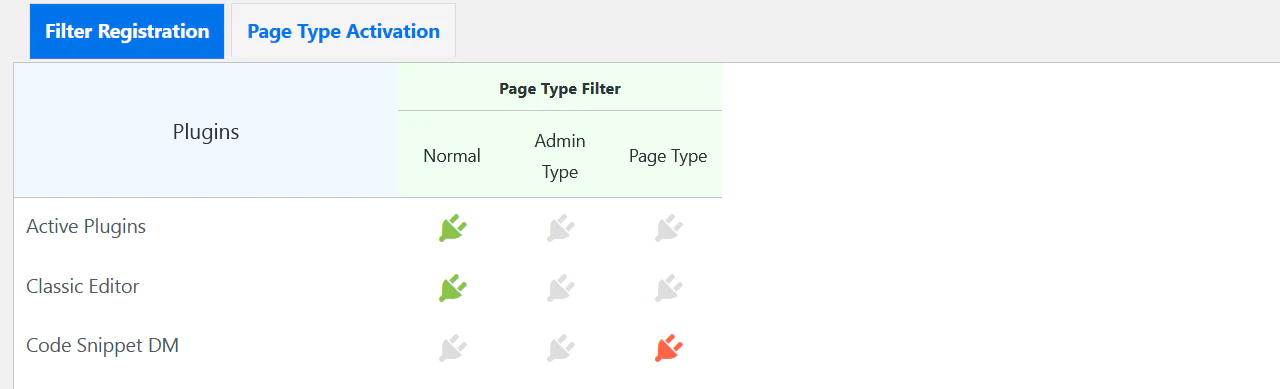
- In your WordPress admin dashboard, click on the “Plugin Load Filter” button.
- You should see all your active plugins listed here, all with a green plug icon active under the “Normal” column.
- To assign a plugin to work only on a Page or Post, you need to click the red plug icon under the “Page Type” column.
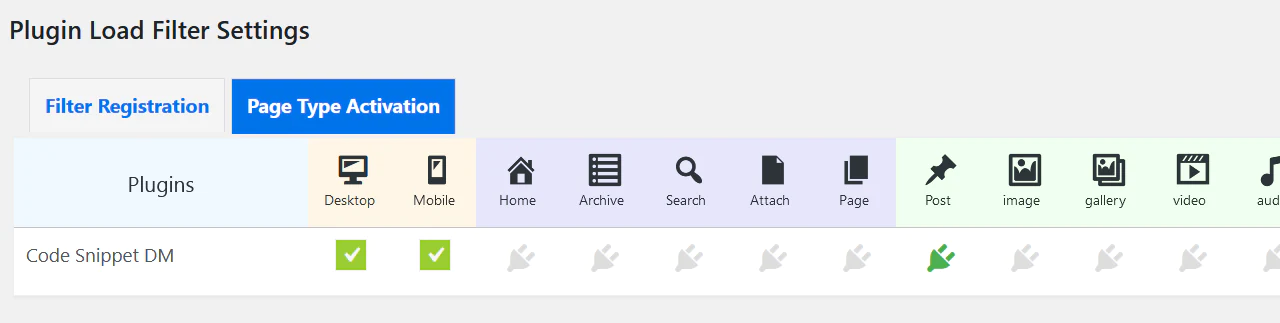
- For example, I use another great plugin called Code Snippet DM to embed code into this website. I know that I only use this in Posts, so I want to disable it from loading its scripts on all my website’s Pages and Homepage. You can test this with any plugin you have installed.
- Once the red plug icon is activated, scroll down and click the “Filter Entry” button.
- Scroll back up and click the “Page Type Activation” tab, next to “Filter Registration” tab.
Page Type Activation tab
In the next tab, you will now see the plugin you selected, in my case “Code Snippet DM”. This is where we will now set it to only run its scripts on posts and not pages on my website:
- First I know that I want it to be active on both Desktop and Mobile, so I tick both those boxes.
- I don’t want it active and running on my Homepage, so I leave that plug icon gray.
- I also don’t want it active and running on any pages, so I again leave that plug icon gray.
- I do however want it to run on all my posts, so I click and turn the plug icon to green, under the “Post” column.
- Click the “Activate Plugin Entry” button to save the changes.
Great, now this plugin should only run on our posts and not anywhere else on our WordPress website.
Check Current Active Plugins per Page and Post
To check and test this, we are going to use the “Active Plugins” plugin that we created earlier, together with the “Active Plugins Page” and “Active Plugins Post” that have the [activeplugins] shortcode.
- Go back to your “Active Plugins Page” preview and refresh it, otherwise go back to its edit page and click the “Preview” button again.
- You should now see that the plugin you chose (in my case “Code Snippet DM”), is no longer part of the list, therefore its scripts are no longer being loaded on any pages, which is exactly what I wanted, as I only want it running in my posts.
Next, let’s check if it is running in my posts:
- Go back to your “Active Plugins Post” preview and refresh it, otherwise go back to its edit page and click the “Preview” button again.
- Here the list of my active plugins will still contain the “Code Snippet DM” plugin, as I need it for all my posts.
Awesome, everything is working as intended. I have now successfully optimized my WordPress website’s Load Speed times, by programmatically disabling the “Code Snippet DM” plugin form loading on Pages, where it isn’t required.
This is however only one of all my active plugins, so I will now need to do the same with all other plugins that I know should only work on either a per page or per post basis.
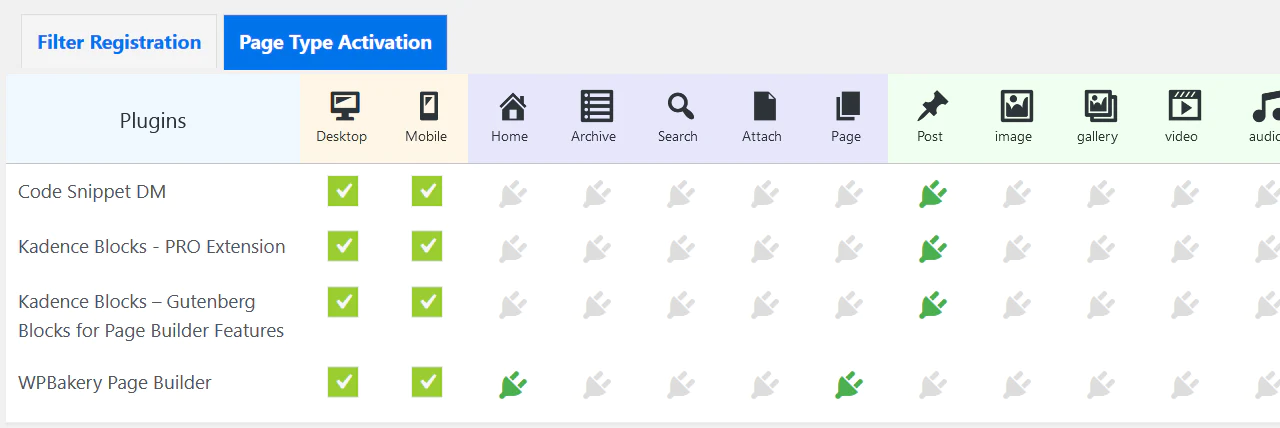
WpBakery & Gutenberg Blocks Example:
I only use WPBakery to design my homepage and other pages due to it offer great design features, but I don’t want to load its scripts in my posts, as I use Gutenberg Block to write my content due to it being much faster in terms of general load speeds.
To set this up, I do the following:
- Back in the “Filter Registration” tab of the “Plugin Load Filter” plugin settings, I click the red plug icon under the “Page Type” column.
- Then in the “Page Type Activation” tab, I select the “Homepage” and “Pages” columns, leaving “Posts” column icon gray, in order to disable the WpBakery plugin in all my posts.
- When I again refresh the “Active Plugins Page”, I still see it in the current active plugins list, but when I refresh the “Active Plugins Post”, it’s no longer there, meaning it wont use up load times and resources, helping speed up my blog content posts load times, while still allowing me to design great looking pages, which Gutenberg does poorly.
This not only optimizes my website, but also opens doors to be able to make use of the best of two different plugins, that each have their pros and cons.
Admin Only Plugins
So far I’ve shown you that plugins can be selectively activated on either a Page or Post basis, but not all plugins need to be active in either of these as well. Some plugins are only means to run in your WordPress Admin dashboard.
- The Plugin Load Filter plugin is actually one of these, as there is no need for it to be running its scripts on any of your pages or Posts. It only needs to run in the admin backend.
- The WebP Converter for Media plugin that I use to optimize my images to WebP or AVIF, also doesn’t need to run on any Pages or Posts, as its job is to simply create web optimized images from my Media folder while I edit or create new content in the backend. Once this process is complete, its job is done, as the WebP or AVIF image is then created and saved in the database, so there’s no need for its scripts to constantly run on the frontend Pages or Post.
- The Classic Editor plugin is another example of a plugin that only needs to run when you are in the WordPress admin dashboard, as you only use it when creating a page or post. Once it’s created, its scripts are not required on the front end.
- I also use the Yoast Duplicate Post plugin for duplicating post layout in my back. Here again, there is no need for it in the frontend, making it an admin only plugin.
Alright, so hopefully you get the picture on which type of plugins don’t need to run on either pages or posts, as they are only required to run when you are using the WordPress backend.
By also disabling these, will again reduce the amount of scripts that run on both your pages and posts, thereby further reducing your website’s load speeds.
To set this up is again very easy to do using the “Plugin Load Filter” plugin:
- Navigate back to the “Filter Registration” tab of the “Plugin Load Filter” plugin settings
- This time, click the red plug icon under the “Admin Type” column.
- Once the red plug icon is activated, scroll down and click the “Filter Entry” button.
That’s it! No need to set anything more in the “Page Type Activation” tab, as the selected plugins will now only execute their scripts in the WP Dashboard.
It’s best to always test, if a pledging can or can’t be activated, by again refreshing the “Active Plugins Page” page and “Active Plugins Post” as well as to have a general look at your website to make sure nothing is missing or broken.
If it is, return the plugin back to a Normal type instead of an Admin only.
Disable plugins on a Global or Per Page or Post Settings
All of the above settings found in the “Plugin Load Filter” plugin setting page, are global, meaning that they apply to all Pages or Posts, as we have set them up.
There are however times when we want to narrow it down even more, such as when we only want the contact form’s scripts to run on the Contact page and not any other pages.
Fortunately, the “Plugin Load Filter” plugin lets us do this as well.
You can also select exactly which plugins you want to run, under the settings of the “Plugin Load Filter” plugin, within the page or post you are creating.
Contact Form 7 Example:
As mentioned earlier, in most cases the contact form is only located on your Contact page, so it would be unnecessary and wasteful to have its scripts run on other pages.
So, in order to narrow it down to only the Contact page, you can do this by activating it only the Contact page settings:
- In the “Plugin Load Filter” plugin setting page, make sure to first set the contact form plugin to “Page Type” under the “Filter Registration” tab, otherwise it won’t be recognized in the Contact page settings.
- In the “Page Type Activation” tab, you can leave it as globally enabled on all pages, as this will be overridden in the Contact page settings..
- Now, go back and edit your Contact page.
- Under the “Plugin Load Filter” plugin settings, switch from “Not Use” to “Use”.
- Now enable the Contact form plugin on “Desktop” and “Mobile” tick boxes,
By doing this, you are telling WordPress that you want to use the Contact Plugin on this page only. The “Plugin Load Filter” plugin automatically knows to disable all other plugins not selected. So if there are other plugins you need enabled, make sure to enable them as well.
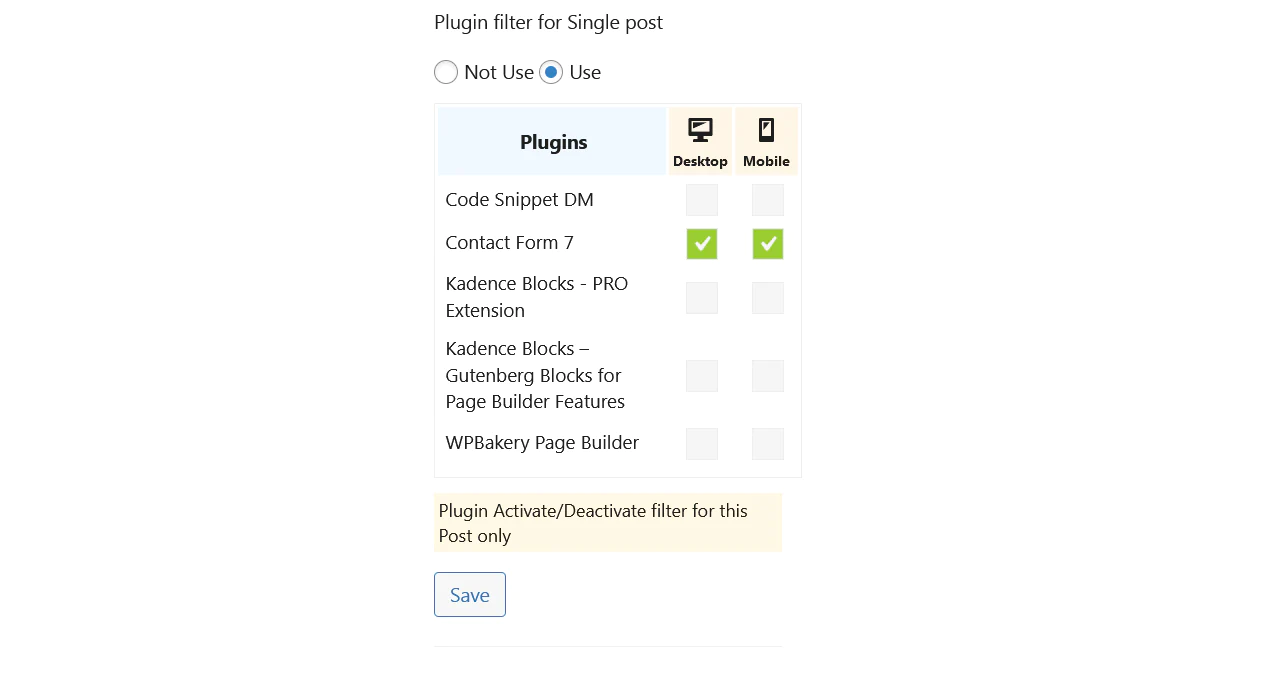
Now the contact form won’t be used on any other Page or Post, except the Contact Page.
Conclusion
If you have made it this far, you should have a very good idea on how to selectively disable WordPress plugins on a Page and Post basis, which will go a long way into decreasing the amount of unnecessary plugin scripts that load on pages and posts that aren’t needed.
If you do this correctly and follow the steps in this tutorial, each one of your WordPress website’s pages and posts will be loading optimally, giving you the best Load Speed ratings, and thus helping you rank higher in Google Search.
If you enjoyed this tutorial, please make sure to share it on your favorite Social media platform using the social share buttons below, for others to enjoy as well.


